

Before writing this blog post, I struggled to find out a complete guide which could help me in integration of Android Recyclerview. Though there were many good explanations about this topic. But, unfortunately one or other was missing with its local database component.
Android Recyclerview without being integrated with its local database seems incomplete. You may need to utilize Android Recyclerview with its local database.
At this time when I am writing about it, the most popular and best approach is to use Android Room Library as a wrapper on Android Sqlite native interfaces. So, I decided to go with Android Recyclerview using Room Library.
This guide will contain source code which will be written in Java Language.
We will follow these steps in the same order :
1. Create your Data Structure
If you have already created your structure, great, you can utilize the same while going through this blog post.
I will simply share the one, just to explain the working.
Example Structure
Table Name : musical_instrument
Columns :
– instrument_id INTEGER
– instrument_name TEXT
– type TEXT
Lets create Entity class for this data structure:
/**
 * Auto generated using Code Generator
 *
 * For more information about this tool, please visit
 * https://www.coding-made-easy.com

 * This file is Generated on : Wed Nov 25 13:49:13 GMT+05:30 2020
**/

package com.database;

import androidx.room.ColumnInfo;
import androidx.room.Entity;
import androidx.room.PrimaryKey;

@Entity(
    tableName = (DatabaseConstants.InstrumentTableKey.TABLE_NAME))

public class Instrument {

   @PrimaryKey(autoGenerate = true)
   @ColumnInfo(name = DatabaseConstants.InstrumentTableKey.INSTRUMENT_ID_FIELD)
   public Integer instrumentid;

   @ColumnInfo(name = DatabaseConstants.InstrumentTableKey.NAME_FIELD) public String name;

   @ColumnInfo(name = DatabaseConstants.InstrumentTableKey.TYPE_FIELD) public String type;

   public Instrument() {

      name = null;
      type = null;
   }
}
2. Create Database Helpers using Android Room Library
Lets generate all the database helpers using ‘Code Generator’ which is available on play store for free download. Once you download the application, go through this step-by-step guide here to generate your source code.
3. Create custom Android Recyclerview Adaptor
Custom Android Recyclerview adaptor will be used to handle the behavior of each list item or row being displayed. This is where you can add your controls for every item sa.
– Enabling/disabling of any list item depending upon certain conditions.
– Choose specific background color of items depending upon some status being retrieved from your database.
etc..
Go through the source code snippet attached below :
/**
 * Auto generated using Code Generator
 *
 * For more information about this tool, please visit
 * https://www.coding-made-easy.com

 * This file is Generated on : Wed Nov 25 13:49:13 GMT+05:30 2020
 **/
package com.gui;

import android.content.Context;
import android.view.LayoutInflater;
import android.view.View;
import android.view.ViewGroup;
import android.widget.TextView;

import com.codingmadeeasy.myapplication.R;
import com.database.Instrument;
import com.gui.InstrumentListAdapter.InstrumentViewHolder;

import java.util.List;

import androidx.recyclerview.widget.RecyclerView;
public class InstrumentListAdapter extends RecyclerView.Adapter<InstrumentViewHolder> {

    private final LayoutInflater mInflater;
    private List<Instrument> data;

    InstrumentListAdapter(Context context) {

        mInflater = LayoutInflater.from(context);
    }

    class InstrumentViewHolder extends RecyclerView.ViewHolder {

        private final TextView dataText;

        private InstrumentViewHolder(View itemView) {
            super(itemView);

            dataText = itemView.findViewById(R.id.text_recyclerview_item);
        }
    }

    @Override
    public InstrumentViewHolder onCreateViewHolder(ViewGroup parent, int viewType) {
        View itemView = mInflater.inflate(R.layout.instrument_recyclerview_item, parent, false);
        return new InstrumentViewHolder(itemView);
    }

    @Override
    public void onBindViewHolder(InstrumentViewHolder holder, int position) {

        if (data != null) {

            Instrument current = data.get(position);
            holder.dataText.setText(current.name+ "");
        }
        else {
            holder.dataText.setText("No Text");
        }
    }

    void setData(List<Instrument> data) {

        this.data = data;
        notifyDataSetChanged();
    }

    @Override
    public int getItemCount() {
        if (data != null)
            return data.size();
        else return 0;
    }
}
If you need to perform single click or long click in your recyclerview, you may need to update your view holder with these lines given below.
If you find that a lot of work, I would suggest you generate your source code for entire recyclerview using ‘Code Generator’ in few clicks. In this application you can have control for more options such as : Recyclerview with multiselect options, delete feature, create new item, update existing data by clicking on the recyclerview item, etc…
Or, you can utilize the given source code and enable click functionality in your source code. The best practice would be to create custom click listener and pass the reference to your custom recyclerview from your activity holding listview or recyclerview.
class InstrumentViewHolder extends RecyclerView.ViewHolder
                            implements View.OnClickListener, View.OnLongClickListener {

 private final TextView dataText;
 private final CheckBox checkBox;

 private InstrumentViewHolder(View itemView) {
 super(itemView);

    dataText = itemView.findViewById(R.id.text_recyclerview_item);
    checkBox = itemView.findViewById(R.id.tick_recyclerview_item);

    itemView.setOnClickListener(this);
    itemView.setOnLongClickListener(this);
 }

 @Override
 public void onClick(View v) {

    //TODO: Handle single click here
 }

 @Override
 public boolean onLongClick(View v) {

    //TODO: Handle long click here
 }
}
4. Create Android View Model
We are utilizing Android view model to handle UI related data. It is a good practice to use Android view model because it enables you to control your data with in a lifecycle of your activity or fragment. It can also survive your screen orientations.
Lets have a look at this code snippet :
/**
 * Auto generated using Code Generator
 *
 * For more information about this tool, please visit
 * https://www.coding-made-easy.com

 * This file is Generated on : Wed Nov 25 13:49:13 GMT+05:30 2020
 **/
package com.gui;

import android.app.Application;

import com.database.Instrument;
import com.database.InstrumentDao;
import com.database.InstrumentRepository;
import com.database.AppRoomDatabase;
import com.database.DatabaseConstants.InstrumentTableKey;

import java.util.List;

import androidx.lifecycle.AndroidViewModel;
import androidx.lifecycle.LiveData;public class InstrumentViewModel extends AndroidViewModel {

    private InstrumentRepository repository;

    private LiveData<List<Instrument>> liveData;
    private InstrumentDao dao;

    public InstrumentViewModel(Application application) {
        super(application);

        AppRoomDatabase db = AppRoomDatabase.getDatabase(application);
        dao = db.instrumentDao();

        repository = new InstrumentRepository(dao);
        liveData = repository.getAllData();
    }

    LiveData<List<Instrument>> getAllData() {

        return liveData;
    }

    Long insert(Instrument data) {

        return repository.insert(data);
    }

    int update(Instrument data) {

        return repository.update(data);
    }

    Instrument get(Integer id) {

        return repository.get(InstrumentTableKey.INSTRUMENT_ID_FIELD + " = '" + id+ "'");
    }
}
5. Create layout XML file holding your recyclerview frontend.
Add this xml file in your layout folder with the name ‘instrument_activity.xml’
This file contains your recyclerview for its placeholder on the screen.
<?xml version="1.0" encoding="utf-8"?>
<!--* Auto generated using Code Generator
    *
    * For more information about this tool, please visit
    * https://www.coding-made-easy.com

    * This file is Generated on : Wed Nov 25 13:49:13 GMT+05:30 2020
    **-->
<androidx.constraintlayout.widget.ConstraintLayout xmlns:android="http://schemas.android.com/apk/res/android"
    xmlns:app="http://schemas.android.com/apk/res-auto"
    xmlns:tools="http://schemas.android.com/tools"
    android:id="@+id/linearLayout"
    android:layout_width="match_parent"
    android:layout_height="match_parent">

    <androidx.recyclerview.widget.RecyclerView
        android:id="@+id/recyclerview"
        android:layout_width="match_parent"
        android:layout_height="wrap_content"
        app:layout_behavior="@string/appbar_scrolling_view_behavior"
        app:layout_constraintEnd_toEndOf="parent"
        app:layout_constraintHorizontal_bias="0.0"
        app:layout_constraintStart_toStartOf="parent"
        app:layout_constraintTop_toTopOf="parent" />

</androidx.constraintlayout.widget.ConstraintLayout>
Add ‘instrument_recyclerview_item.xml’ in your layout folder. This file holds the recyclerview row. As we have only used one text field to be displayed as instrument name on each recyclerview item.
<?xml version="1.0" encoding="utf-8"?>
<!--* Auto generated using Code Generator
    *
    * For more information about this tool, please visit
    * https://www.coding-made-easy.com

    * This file is Generated on : Wed Nov 25 13:49:13 GMT+05:30 2020
    **-->
<LinearLayout xmlns:android="http://schemas.android.com/apk/res/android"
    android:orientation="horizontal"
    android:paddingBottom="10dp"
    android:layout_width="match_parent"
    android:layout_height="wrap_content">

    <TextView
        android:id="@+id/text_recyclerview_item"
        android:layout_marginBottom="5dp"
        android:paddingLeft="8dp"
        android:layout_width="match_parent"
        android:layout_height="60dp"
        android:gravity="left|center"
        android:textColor="@android:color/black"
        android:background="@android:color/white" />
</LinearLayout>
6. Create Activity holding your frontend and backend together.
This is the last step, we will create an activity which is going to be the entry point for your recyclerview display.
Here, we are going to fetch data from your local database and initialize custom recyclerview adaptor, we created earlier.
We want our list to be updated as and when there is any change in the local database for instrument table.
To achieve this, we have added observe in the initListView method as given below:
/**
 * Auto generated using Code Generator
 *
 * For more information about this tool, please visit
 * https://www.coding-made-easy.com

 * This file is Generated on : Wed Nov 25 13:49:13 GMT+05:30 2020
 **/
package com.gui;

import android.os.Bundle;
import android.widget.Toast;

import com.codingmadeeasy.myapplication.R;
import com.database.Instrument;

import java.util.ArrayList;
import java.util.List;

import androidx.appcompat.app.AppCompatActivity;
import androidx.lifecycle.ViewModelProvider;
import androidx.recyclerview.widget.LinearLayoutManager;
import androidx.recyclerview.widget.RecyclerView;
public class InstrumentActivity extends AppCompatActivity {

    private InstrumentViewModel viewModel;

    private List<Instrument> mainList;

    private RecyclerView recyclerView;
    private InstrumentListAdapter adapter;

    @Override
    protected void onCreate(Bundle savedInstanceState) {
        super.onCreate(savedInstanceState);
        setContentView(R.layout.instrument_activity);

        //initializing all the UI elements
        recyclerView = findViewById(R.id.recyclerview);

        viewModel = new ViewModelProvider(this).get(InstrumentViewModel.class);

        adapter = new InstrumentListAdapter(this);
        recyclerView.setAdapter(adapter);
        recyclerView.setLayoutManager(new LinearLayoutManager(this));

        initListView();
    }

    /*
    This method shall be used to initialize the list view using observer,
    here onChanged shall be triggered realtime as the data changes
     */
    private void initListView() {

        viewModel.getAllData().observe(this, currentList -> {

            if(mainList == null) {
                mainList = new ArrayList<>();
            }
            else {

                adapter.setData(mainList);
            }
        });
    }

    /*
    Wrapper for displaying toast messages
     */
    private void ShowToast(String message) {

        Toast.makeText(this, message, Toast.LENGTH_SHORT).show();
    }
}
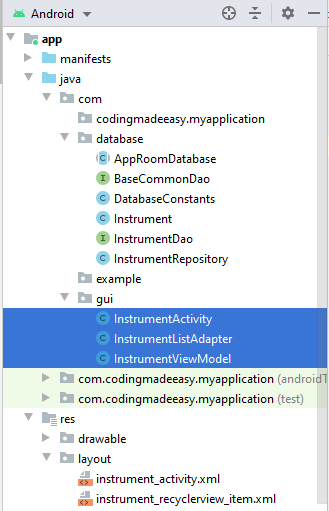
Android Studio Hierarchy
This is how your project structure should look like. Below screenshot is added just for the same of reference.
Conclusion
We have tried to keep this tutorial short, so that you could quickly integrate android recyclerview in your live project.
Don’t miss to subscribe, I will be sharing more contents on software programming practices.
If you haven’t tried the ‘Code Generator’ as yet, or if, you want to save your time and generate the source code for your entire recyclerview or database helpers. This tool here might be of use to you.
If you want to checkout the full source code attached in this blog post, you can download the same by clicking on the button given below :
3 thoughts on “Android Recyclerview using Room”
Thanks a lot for the article.Thanks Again. Want more. Willow Umana
Great blog article.Really thank you! Cool.
you share great articles. thank you for your bloog